Page 3 of 3
Re: Possum Pelt Processing.
Posted: Mon Mar 10, 2014 8:04 pm
by hankaye
Mataura mayfly, Howdy;
I'd have to realign me computer times if I were to avoid the meal times.
Ain't much that puts me off my feed. Just got done with some beef stew and
this mornings was some over-easy eggs with sausage and fried shredded 'taters.
Ray's delightful display of edibles accompanied my dinner...
After a dinner of sheep's brains with eyeballs, squid, octopus and a few other
nifty critters that was a dinner in our honor in Turkey (circa 1970), just about
anything goes, I did say
almost ...didn't I??

hank
Re: Possum Pelt Processing.
Posted: Tue Mar 11, 2014 11:28 am
by crazy4oldcars
Same here, Hank. Dad used to pick at me because I would ask what he wanted for lunch while we were cleaning Squirrels.
Of course, being a teenager, I was about ready to eat the squirrel.
Kirk
Re: Possum Pelt Processing.
Posted: Thu Mar 13, 2014 2:11 am
by Mataura mayfly
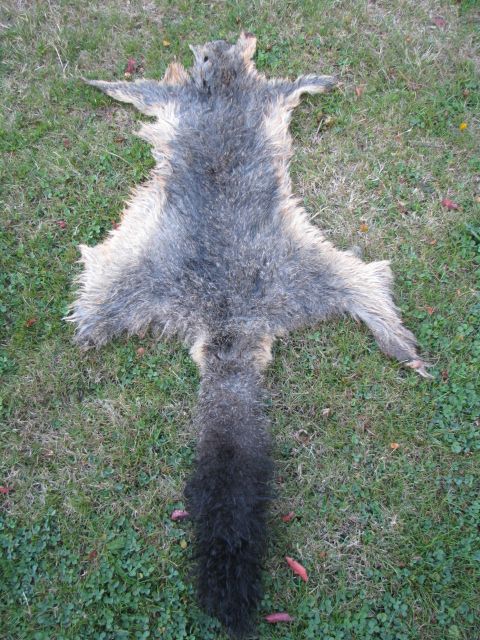
Right, Borax treatment of Possum pelts.
Basically you follow all steps thus far, up to the rinsing off after fleshing. Then with your freshly washed, clean and salt/flesh free skin, wring as much water as possible from the fur and leave it to dry for a couple of hours.
This drying time will vary, depending on outdoor temperatures, water content left on the skin, humidity etc., but you want the fur basically dry and the skin to still be wet- but not dripping wet. It is a judgement call.

If it is too wet the Borax will turn to a slurry and run into the hair side of the hide and dry there like glue (in my experience).
Once the decided dryness is obtained, find yourself a flat board big enough to tack nail the entire skin (tail included) (old MDF pallet tops work great)- some small flat head nails (galvanised not bright steel)- a hammer and possibly a knife to trim ugly uneven bits that may be there and unwanted.
I like to start at the head end of the skin and tack the hide fur side down on the board. You want to stretch the skin taunt- but not overly so, remove the creases, but do not pull that tight that you tear the last nail position. Work around the edge of the hide, tacking a nail every couple of inches. Some areas will require more or closer nail spacings, some will need re-positioned, but as you work your way around it will all become clear if any adjusting needs done.
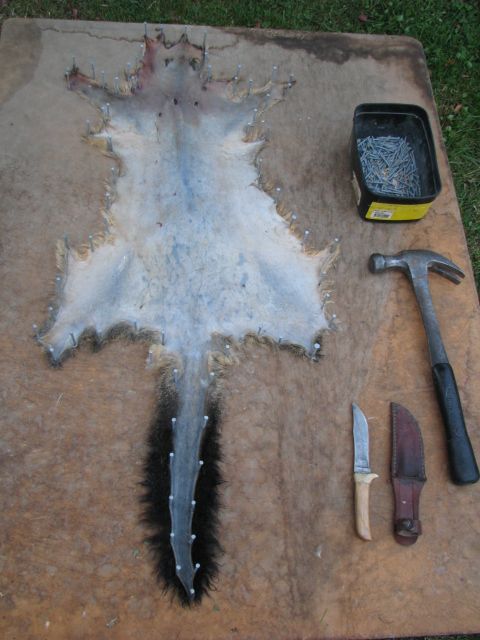
Once it is all pinned out and looking the way you want, give the flesh side a liberal dusting of the Borax powder. You do not need to "bury" the hide from view, just an even liberal coating over the entire flesh side- making sure to get in to any edge areas that may have curled up as you were pinning out.
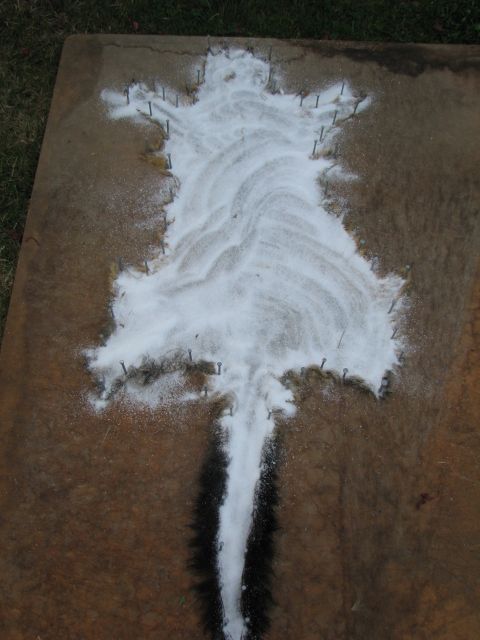
No pick the whole kit and kaboodle up, keeping it horizontal and place it somewhere out of the way- out of kid/pet reach and out of direct sunlight until the pelt is entirely dry and feels quite stiff to the touch.
In my case, I place the board on top of an old chest freezer that resides in my workshop.
Re: Possum Pelt Processing.
Posted: Thu Mar 13, 2014 12:00 pm
by letumgo
Jeff - Seeing the skin stretched out on the board reminded me of beaver trapping with my dad. He and I used to do a lot of trapping (beaver, muskrat, otter, fox, raccoon, mink, bobcat, etc.) to sell for garments. To get the highest price, the beaver skins were always stretched out so that they were nearly perfectly round. The nails needed to be every half inch, to one inch apart, so there was no narrow sections when the skins were measured.
Sorry for the hi-jack, just wanted to let you know I was still following along, even when my mind wanders.

Re: Possum Pelt Processing.
Posted: Thu Mar 13, 2014 1:56 pm
by Mataura mayfly
Ray, no apology needed. That kind of experience of the fur trade side of pelt preparation is exactly how I learnt to deal with all these things.
Granted, some of the process differs and there are a few extra steps involved in producing the finished article, but all the skinning- fleshing and pinning out knowledge is from that era.
When fur trading I used to process up to 60 possums per night, often with very little sleep involved if shooting instead of trapping (possums are nocturnal). I would start at night and shoot under a spotlight, collecting the animals as you go. Then back to "where-ever" (often a cabin in the bush) to catch a couple of hours shut eye and then be faced with skinning the take after they had cooled. This was always done in the worst of Winter- as that is when the fur is at its best. Shooting was colder- but did allow selection of colours and sizes. Trapping meant you could stay warm and sleep- but had no choice in what was captured.
For furs, the possums were skinned, the skins fleshed without salting and they were "stretched" over a 4 X 1" board about 3 1/2' long, pinned in place with nails and hung to air dry. Once dry they were stripped from the board- tails split- fur brushed and they were bundled fur to fur and skin to skin in bundles of 20 then tied with string. Once a good supply was in, you went to auction with your stash and took your chances with what the current fur prices were.
Best prices I can remember was when we were getting $26:00 for XL dark brown first grades........ That was when I was earning $2:69 per hour in my regular daytime job.......
Skins like the one above under Borax- I would not have bothered with back in the day. It is small, there are two bullet holes in the shoulder/neck area, there is discolouration of the flesh side and the skinning is uneven (my fault). It would have been "down" graded to near worthless. You had to do your bit and have good quality hides to glean top dollar back in the fur trade days.
Re: Possum Pelt Processing.
Posted: Fri Mar 14, 2014 7:53 am
by William Anderson
Jeff, I am pretty far removed from this sort of thing and appreciate the time and effort you've put into all the furs you've shared and the time to document and share the process. I'm very happy with the sections I have and it's really a major part of what I've been doing lately. I seem to continue sliding toward natural materials, which is nothing new, but I'm much more conscientious about the very subtle differences in dubbings. Some of you have been focussed on this level of detail for ages, but once I started cutting and separating hare's masks dubbings into 4-6 tones and types it made me reconsider many of the blends that I have put together. I understand why the prepackaged material industry provides the products they do, but it seems a different sport entirely compared to what you're doing with these skins. I am looking over the skin here and imagining where bits and pieces that I've been given or purchased come from. Thanks again for this tutorial. It's gross...and I'm glad someone else is doing it, but it's great to see.
w
Re: Possum Pelt Processing.
Posted: Sat Mar 15, 2014 8:01 pm
by Kelly L.
Very interesting Jeff. I don't know if you've ever used Neatsfoot Oil after your tanning solution, and rinse...but a friend of mine uses that on his skins. He puts the first coat on very thick. It soaks in, and in a few hours, he gives it another coat. It keeps the skin from getting hard. Later I believe he adds a third coat, but not as thick. If the weather is good, it should only take a few days until it is dry. Your Possums there are amazing. It seems like you have this tanning thing down to a fine art!
Re: Possum Pelt Processing.
Posted: Sat Mar 15, 2014 8:13 pm
by Mataura mayfly
No art involved Kelly, just follow the instructions and you cannot really go wrong!
I have used various oils, indeed the tanning solution manufacturers also put out a "dressing" oil that can be bought as a duo pack with the chemical tanning bottle.
Most are a mixture of vegetable oils and should be "painted" on to the hide when it is almost dry after tacking out on the board flat.
If tanning for fly tying material purposes I do not oil any of the hides and allow them to dry stiff and somewhat inert. In my mind a full pelt (or section thereof) is better handled if the leather is stiff and allows the user to ship/pinch the amount of fur/hair he or she requires.
Oiled and soft is good for ornamental hides and some of them "treat" the leather well enough that it may be machine washed and dried (if soiled) yet still retain a soft flexible leather afterward.