Page 2 of 3
Re: Demonstration of Dubbed Silk Body Technique
Posted: Tue Jul 29, 2014 7:20 pm
by letumgo
Re: Demonstration of Dubbed Silk Body Technique
Posted: Wed Jul 30, 2014 9:59 am
by gingerdun
Ray,
Very interesting post and video, and good discussion from William and all.
As William says, the pant leg method that your cool block imitates is helpful if the goal is a tighter noodle with the fibers parallel to the thread.
The alternative method I use, on the hard-surface Clark block is this:
1. After doubling the waxed thread on top of the dubbing, and while the loop is still anchored by the post on the block, I lift the threads up and start twisting to trap the dubbing.
2. Then I moisten my finger tips, and while holding the end of the "rope", I pinch-rub the dubbing back and forth between my fingers to get it to lie down tighter on the waxed thread.
3. Then I continue spinning the body. This makes a leaner, more streamlined noodle.
4. Before wrapping the body around the hook, I sometimes will pinch and rub the dubbed part back-and-forth between my wetted fingertips again to get them to lay down.
I admit that I have been partial to the shaggier effect when the dubbed fibers stick out more perpendicular to the thread. After wrapping the body on the hook, and then adding ribbing, the fibers are less shaggy, and may require pulling out with a needle or velcro to get the leggy, transparent effect that has been working for me.
My experience has been that preparation of the dubbing fibers, and how heavily you lay them on the thread, are equally important to the final look of the body, regardless of how you spin them. I've been using mostly embroidery wool lately, cut up into varying lengths from 1/8 to 3/8". This helps a lot to make the body more manageable.
If I want to give it a haircut, I do that after I lash the body to the bend of the hook, while gripping the other end in the hackle pliers. Then I have a good view and good control for trimming unruly fibers, and helping to shape the taper.
Obviously there are many ways to do this, and no one right way. It all depends on the look you want in the fly.
Re: Demonstration of Dubbed Silk Body Technique
Posted: Wed Jul 30, 2014 10:25 pm
by DOUGSDEN
Guys,
This thread is just awesome! William, your blocks are to die for! The shape and the groove in the last one pictured....Wow! You keep improving and refining them and that's really cool!
Lance, when I read your description of spinning bodies on the traditional Clark block, I just about fell over! This is nearly the same way that I spin when the block is out and the cards are being loaded! Thank you for that! Very good descriptions!
William again, I remember at Roscoe #1 when we would get together and tie the "experimenting" you were doing at the time with different surfaces and textures on the block and how they affected the spun body. You have taken this to a much higher level and I think you are bordering on greatness and genius as evidenced by your unbelieveable spun bodies. The consistency of them is really quite impressive. I saw this same thing on the many cards of spun bodies that Lance showed us from his dad's fine collection.
Ray, how crazy ingeneous is the bigger block with the fabric fused to it and cut on a curve! The tutorial photographs (I haven't flipped over to Youtube just yet but I will! I can't wait to see that!) are excellent and I can fully understand from the photo's you have posted just how that works. I think I am going to start shaping and sanding and fusing a new style block (with your permission!) or two and get crackin' on this technique. Thank you Jim Slattery for fresh idea's! Speaking of fresh, I noticed the really good looking breakfasts that you serve at your place! Wow! Yet another reason why I should not have missed this get together!
My head is just swimming with good thoughts about this thread! What an impressive bunch of good idea's and photo's! Thanks fellows for enlightenment and fun!
Dougsden
Re: Demonstration of Dubbed Silk Body Technique
Posted: Sun Aug 03, 2014 7:40 am
by Ruard
Hi Ray,
Thank you for the video it makes things a lot more clear for me. As you can imagine I will stay at my reversed Clark block, it is easy to handle and easy to adjust the amount of spinning.
Perhaps I will use the kind of tweezers you use because so you can get more evenly noodles, if you like that. Where did you buy them??
Greeting
Ruard
Re: Demonstration of Dubbed Silk Body Technique
Posted: Sun Aug 03, 2014 10:09 am
by letumgo
Ruard,
Unfortunately I no longer remember where I bought these tweezers. I have had them for many years. Any tweezers with a long narrow profile will give you similar results. I just liked Jim's trick of trimming the dubbing into an elongated triangle. It was a fast, and efficient method I had not seen before.
Re: Demonstration of Dubbed Silk Body Technique
Posted: Sun Aug 03, 2014 10:29 am
by ashley
Thanks for the video, think I'll have to make one of those boards during the next week or so.
I think I got some similar tweezers from the fly tyers dungeon a few months ago.
Ashley
Re: Demonstration of Dubbed Silk Body Technique
Posted: Fri Aug 08, 2014 1:06 pm
by daringduffer
Tremendous Tutorial Thread.
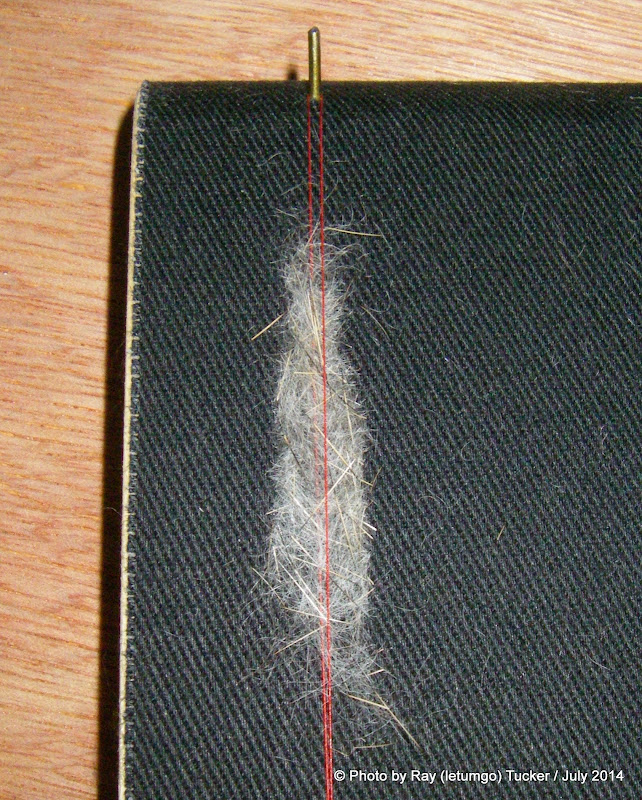
When I started using a dubbing block many years ago, my lack of cleverness resulted in difficulties managing the open loop in the 'nail/pin' end of the loop as can be seen in Ray's photo:
I eventually overcame this problem by making a notch in the rounded part of the block. By doing this, the silk became locked between the two notches and the dubbing was locked by the silk. I could then spin the loose silk end, opposite the pin, with my english hackle pliers and carefully lift the silk from the closest notch with the dubbing still locked in between the silk.
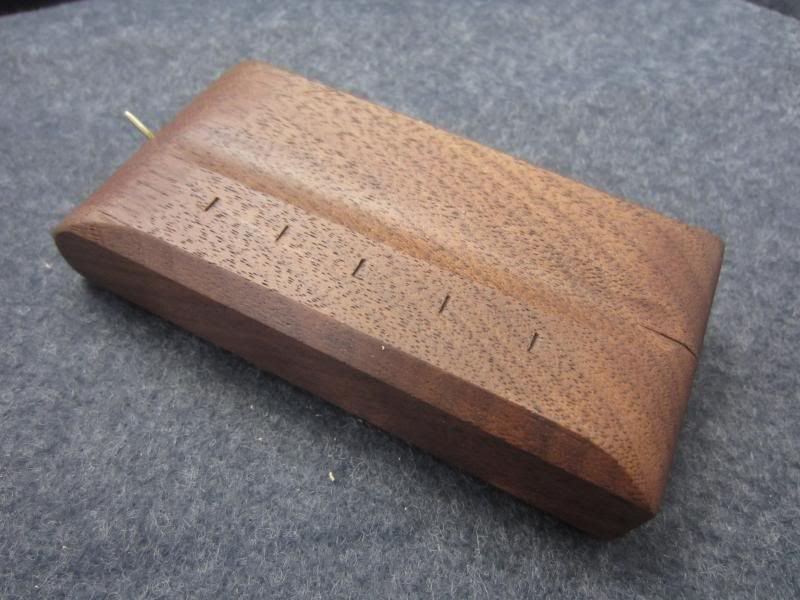
The notch is just like Williams, as can be seen in this photo:
Clear as mud?
dd
Re: Demonstration of Dubbed Silk Body Technique
Posted: Sat Aug 09, 2014 2:20 pm
by William Anderson
Stefan, I think I understand your description and solution, but I have a very subtle technique that I use. I didn't realize I was doing it for some time until I was doing a demo and someone asked me about it. With the second length trapped in the side notch and all dubbing in place as desired, I lift the second length ready to be placed over the dubbing, lift the second length to the left past the first length and withmy middle finger, left hand, hold the second length down on the left side of the first length and secure the end of the second length in the base notch. (Super clear...) anyway. The hight of the first length on the block(depth of the diameter of the waxed silk) is enough to hold the second length perfectly aligned to the first. This works on both blocks that I've made with the rounded smooth front edge or the more crisp angular front edge. It might be something best seen to understand and is so subtle it defies such a long explanation, but it works for me. No additional pin in the top or extra notch. Of course seeing each tier work out their own details is a large part of the interest in using these.
Re: Demonstration of Dubbed Silk Body Technique
Posted: Sat Aug 09, 2014 3:44 pm
by daringduffer
I understand perfectly William. Clever! This was 'silent knowledge' until you were asked that question.
dd
Re: Demonstration of Dubbed Silk Body Technique
Posted: Mon Jun 10, 2019 8:14 am
by FliTrap
letumgo wrote: ↑Mon Jul 28, 2014 8:05 pm
When we were out in Montana, Jim Slattery demonstrated a very efficient way of making dubbed silk bodies on his pants leg. Over this past weekend I made up a new dubbing block, along with a fabric overlay.
Great craftsmanship! Liking the idea for sure as it allows consistency to the efforts of dubbing fly bodies..... Thanks, Ray!
But living in fear.... if my wife sees this and replaces my old tired legs with a block of wood.....