
Thanks to a beautifully shaped and sanded Clark Spinning Block sent to me by Dougsden, my interest in using this type of dubbing technique has recently been re-kindled. Although I have been able to find quite a bit of information on making stand-alone dubbing brushes, using either a spinning block of some kind or on one's trouser leg, I have not uncovered much instruction on how to best apply the finished brushes when dressing a fly.
Does one simply tie it in at the rear of the body using a tying thread on a bobbin, bring the tying thread forward, and then wrap the brush up the hook using your hands (or hackle pliers or similar) before tying it off behind the thorax or hackle? I would much appreciate it if one or more of our members could either explain the preferred process or provide a link to a source that will clarify this for me. A video, if available, would be ideal.
Utilizing Dubbing Brushes
Moderators: letumgo, William Anderson
Utilizing Dubbing Brushes
Some of the same morons who throw their trash around in National parks also vote. That alone would explain the state of American politics. ~ John Gierach, "Still Life with Brook Trout"
-
CreationBear
- Posts: 1156
- Joined: Sun Jun 20, 2010 6:35 pm
Re: Utilizing Dubbing Brushes
Far from an expert, but one thing I do like to do is insert a dubbing twister in the brush's loop before wrapping the brush up toward the eye--that way if you've misjudged the amount of dubbing you've loaded in, you can torque/untorque the brush as you wrap to ensure you'll hit the tie-off point with bare silk. (Of course, if you've really overcooked the dubbing--as I tend to do--you can loosen the whole thing up and do a quick liposuction.  )
)
Otherwise, I mount the brush at the hook-barb as you might a length of floss or wire with a couple of loose wraps of tying thread, adjust the positioning of that flymphy silk/dubbing transition , then cover the tag back toward the eye with tying thread.
Otherwise, I mount the brush at the hook-barb as you might a length of floss or wire with a couple of loose wraps of tying thread, adjust the positioning of that flymphy silk/dubbing transition

Re: Utilizing Dubbing Brushes
Here is what Leisenring said (and drew) in THE ART OF TYING THE WET FLY. In Fig. 3, the three parts tied in at the bend, from top to bottom, are: dubbing loop, tinsel, and tail.tie2fish wrote:Does one simply tie it in at the rear of the body using a tying thread on a bobbin, bring the tying thread forward, and then wrap the brush up the hook using your hands (or hackle pliers or similar) before tying it off behind the thorax or hackle?

One of the hardest things for me, like CB said, is "overcooking" the dubbing, putting it on too thick. Getting it sparse and tapered is an art that doesn't come quickly. It is hard to get the dubbing too sparse, actually. Restraint is rewarded with slimmer, buggier-looking flies, and the dubbing won't be so likely to foul the whip finish. Pete Hidy marked little calibration lines on his spinning block to help him gauge the amount of dubbing needed for different hook sizes.
For a thorax style flymph, the hackle can be tied in by the tip when the thread makes its return journey back toward the eye. It has to be back far enough (perhaps 1/3rd of the shank away from the eye) to allow room for winding both the body and the hackle, and for tying them off. I'm not expert at this, so best to hear what others have to say. Jim Slattery is the master of the thorax flymph.
Lance
-
letumgo

- Site Admin
- Posts: 13342
- Joined: Sat Feb 21, 2009 7:55 pm
- Location: Buffalo, New York
- Contact:
Re: Utilizing Dubbing Brushes
Lance - Here is the template that I use on the top of my dubbing block. This is a small piece of artists mat board, which I received from our friend Mark Libertone. One side of the board is white and the other side is black. I have marked both sides of the mat board with small markings to help me gage the amount of dubbing to use. The triangular shape is intended to remind me to taper the body (thicker at the head end - narrow at the tye in end).
In case anyone is interested, the triangle is 1-5/8" long by 3/8" wide (roughly 4 cm long by 1 cm wide). These measurements are not meant to be critical dimensions. They are simply reference points to help me be more consistent when making dubbing brushes. If I was clever, I would come up with a scale that gave different lengths for each hook size.


There are also slits (notches) cut at each end of the mat board. This is modeled after one that I saw Mark Libertone use during his tying demonstrations. I can take the mat board off the dubbing block and tye with it on my leg. The slits help secture the tying silk as the dubbing is put in place.
In case anyone is interested, the triangle is 1-5/8" long by 3/8" wide (roughly 4 cm long by 1 cm wide). These measurements are not meant to be critical dimensions. They are simply reference points to help me be more consistent when making dubbing brushes. If I was clever, I would come up with a scale that gave different lengths for each hook size.
There are also slits (notches) cut at each end of the mat board. This is modeled after one that I saw Mark Libertone use during his tying demonstrations. I can take the mat board off the dubbing block and tye with it on my leg. The slits help secture the tying silk as the dubbing is put in place.
Ray (letumgo)----<°))))))><
http://www.flytyingforum.com/index.php? ... er=letumgo
"The world is perfect. Appreciate the details." - Dean
http://www.flytyingforum.com/index.php? ... er=letumgo
"The world is perfect. Appreciate the details." - Dean
Re: Utilizing Dubbing Brushes
Ray,
This is really good. I like the idea of using the mat board, black on one side. I also like your taper and calibration markings. You and Mark have a great system.
I have tried using the white background when dubbing with white or transparent fur, and it isn't too bad with a strong focussed light casting shadows that make the fibers easy to see. The black background that I had was textured, which made it harder to see the fibers than when they were against smooth white. I haven't tried a smooth black background.
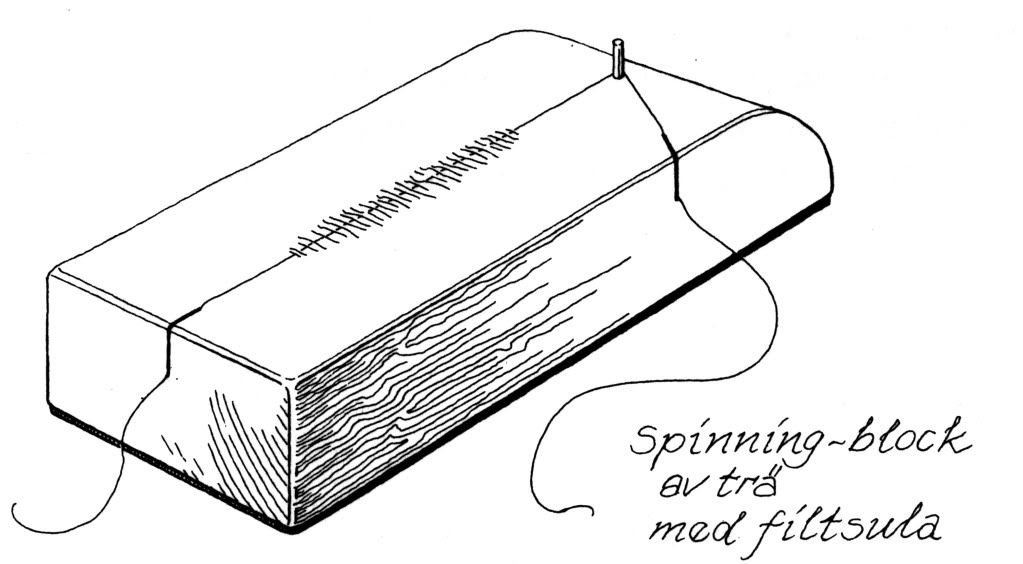
One detail that Pete Hidy insisted upon was the angle of the loop pin at the end of the block. He liked it angled at about 30 degrees. The curved edge made it easier to hammer the pin in at that angle. The angle made it easier to slip the loop off the pin when attaching the loop to the notches in the card. Here's a sketch I made a while ago.

Lance
This is really good. I like the idea of using the mat board, black on one side. I also like your taper and calibration markings. You and Mark have a great system.
I have tried using the white background when dubbing with white or transparent fur, and it isn't too bad with a strong focussed light casting shadows that make the fibers easy to see. The black background that I had was textured, which made it harder to see the fibers than when they were against smooth white. I haven't tried a smooth black background.
One detail that Pete Hidy insisted upon was the angle of the loop pin at the end of the block. He liked it angled at about 30 degrees. The curved edge made it easier to hammer the pin in at that angle. The angle made it easier to slip the loop off the pin when attaching the loop to the notches in the card. Here's a sketch I made a while ago.
Lance
-
letumgo
- Site Admin
- Posts: 13342
- Joined: Sat Feb 21, 2009 7:55 pm
- Location: Buffalo, New York
- Contact:
Re: Utilizing Dubbing Brushes
Lance,
Thank you for sharing this diagram with us. I find it fascinating. You may want to consider adding it to your book, just the way it is.
If you look at the photo of my dubbing block, you will see the notches cut into the edges, just like you show in the diagram. In January I added the two black disks to the side of the dubbing block (one on each side). These are thin plastic disks that are held in place with a flat head screw. These disks are mounted so the they project roughly 3/16" (2 mm) above the edge of the wooden block. I use these to hold the silk in place while forming the dubbing brushes. I find these a little easier to work with than the notch (they hold the silk a little more secure without fraying/snagging the silk).
I have been meaning to share these ideas on here for a while, but kept forgetting. Bill's post reminded me about these photos.
Great conversation.
Ray (letumgo)----<°))))))><
http://www.flytyingforum.com/index.php? ... er=letumgo
"The world is perfect. Appreciate the details." - Dean
http://www.flytyingforum.com/index.php? ... er=letumgo
"The world is perfect. Appreciate the details." - Dean
Re: Utilizing Dubbing Brushes
Ray,
I meant to comment on that plastic disk. Makes a lot of sense, although I cant say I've had any instances of the silk fraying fromn the notches. The notch at the end of the block has been problematic. Sometimes, after I have twisted the loop to make the rope or brush, I want to slide it down into the notch to hold it momentarily while I get a card ready for mounting it. The notch, unfortunately, is not big enough to hold the double strand of twisted silk. I wonder if the plastic disk could be adapted at the end of the block to solve that little problem? Or maybe I just to make a bigger, V-shaped notch at the butt of the block.
Your side notch looks a little funky, but it is hard to see. I wonder if that is causing the fraying problem?

Lance
I meant to comment on that plastic disk. Makes a lot of sense, although I cant say I've had any instances of the silk fraying fromn the notches. The notch at the end of the block has been problematic. Sometimes, after I have twisted the loop to make the rope or brush, I want to slide it down into the notch to hold it momentarily while I get a card ready for mounting it. The notch, unfortunately, is not big enough to hold the double strand of twisted silk. I wonder if the plastic disk could be adapted at the end of the block to solve that little problem? Or maybe I just to make a bigger, V-shaped notch at the butt of the block.
Your side notch looks a little funky, but it is hard to see. I wonder if that is causing the fraying problem?
Lance

Re: Utilizing Dubbing Brushes
Great info guys, thank you. I love the pics and drawings.
Re: Utilizing Dubbing Brushes
Thanks very much, folks. Figure 3, Plate I of the Leisenring info that gingerdun has supplied answers my basic question.
Some of the same morons who throw their trash around in National parks also vote. That alone would explain the state of American politics. ~ John Gierach, "Still Life with Brook Trout"
-
CreationBear
- Posts: 1156
- Joined: Sun Jun 20, 2010 6:35 pm
Re: Utilizing Dubbing Brushes
I'm digging Ray's block design--I'm assuming the next iteration will have a Vernier scale? 